Decorative, burlap details have become a mainstay in country and rustic weddings. And since flowers are also typical decorations, why not include burlap flowers in your decor?
Here I show you how to make burlap flowers with three layers. There are many more ways to create burlap flowers, so please also see the additional styles showcased below the tutorial. Look for the buy links to those designs.

If you prefer a more elegant look, see the DIY burlap and lace flowers tutorial here.
Note: If you arrived via the rustic wedding cake tutorial, the largest (bottom) brown burlap layer is what I used to make the leaves for the roses in the topper.
Inspiration for DIY Fabric Flowers Wedding Décor
You may be wondering how to come up with ideas for using these burlap and other fabric flowers in your decorations. (Besides the obvious, of course.) One way is to turn arts and crafts projects into decor inspiration.
Here, I’ve taken Gina’s felt flower frame for Halloween (at MoneyWiseMoms.com) and transformed it into a table number frame.
The frame is a brown fabric one I found at Goodwill. I inserted the table number, printed on card stock, then glued on the flower. Super easy.
You can use the burlap flower tutorial in this post, and it will look fantastic. But in the picture below, only the bottom layer of the flower is from this tutorial.
The top flower layer is my simple burlap fabric loop flower. And the embellishment is a silver heart locket.
The chalkboard table number template is by Nikki of PaperGravy. She made the whole set available to download. Check it out on the Graphics Fairy site here.
Now on with the three-layer burlap fabric flower tutorial.
What You Need to Make the Burlap Flowers
Since my craftiness level is rudimentary, this tutorial requires only low-level skills and no hot glue. The steps are below. You can either follow along with the video at the bottom of the page or follow the written instructions.
Note: As with most links on MyOnlineWeddingHelp.com, some of the links in this post go to this site’s shop section or directly to another website. My Online Wedding Help will receive a small commission from the merchant if you click and buy a product.
Before starting, collect these supplies:
- Two contrasting colors of burlap. You can find burlap in many colors or patterns in our shop section.
- Scissors
- Tape measure
- Needle with a large eye (big enough to thread a string of burlap through).
- Clear-drying glue
- Small jewels or other decoration for the center.
Instructions for How to Make Burlap Flowers
You will make the top and bottom layers the same way, using steps 2-4 below. The middle, fringy layer is different. Follow step 5 to complete that look.
Here are the steps explaining how to make burlap flowers like those above.
Step 1: Prepare Burlap
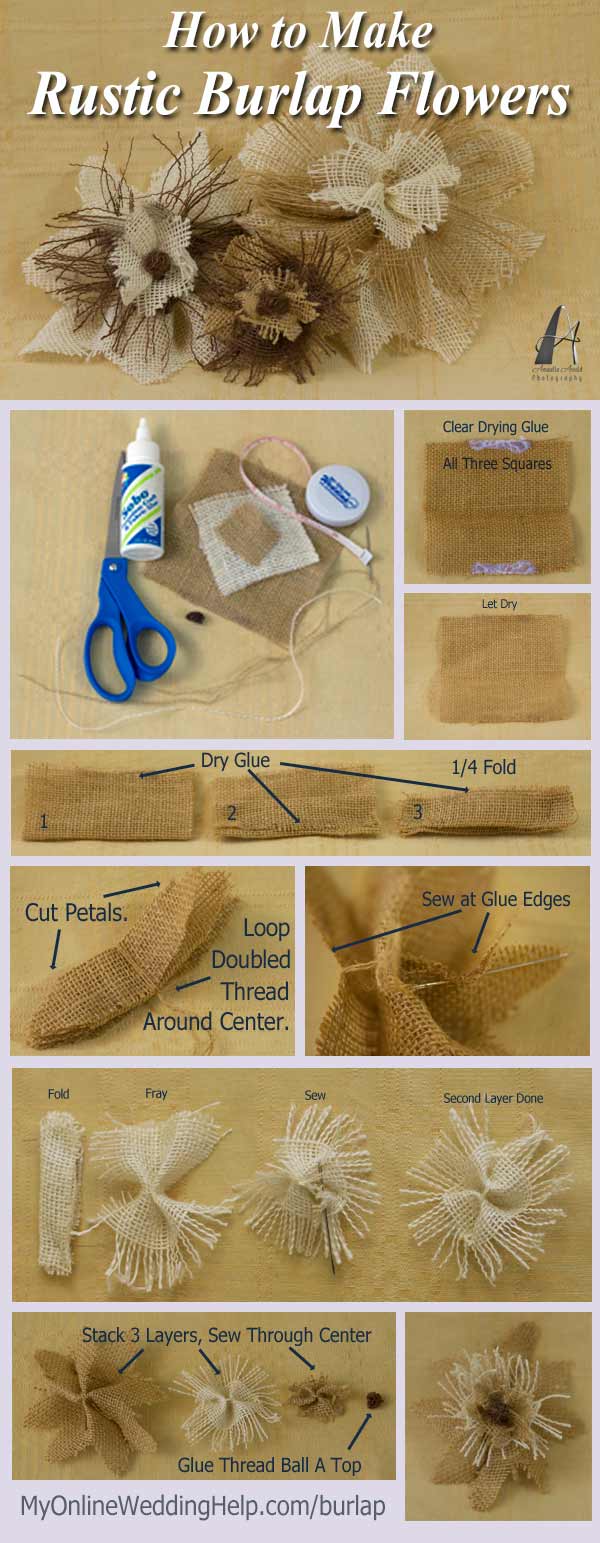
Starting far enough ahead of time for the glue to dry, cut burlap squares, and apply glue to two opposite edges.
Cut three squares, with the middle-sized square in a contrasting color: 7″, 5″, and 3″ (or whatever proportions you like).
Apply clear-drying glue to two opposite edges on each, leaving an inch or so without glue at the corners.
Step 2: Begin Making Petal-ed Layer
Fan-fold the largest piece of burlap into quarters. Fold so the glued edges are long-ways.
Fold in half, glued edges touching.
Fanfold into 1/4.
Step 3: Cut petals and Secure Center
The narrow ends of the folded burlap will be the petals. Cut one end to be rounded or pointed, whatever shape you’d like for the base layer.
Fold in half and, using the first end as a pattern for the second, cut the opposite end of burlap into petals.
Keeping the burlap folded (so you don’t have to measure), loop a doubled burlap strand around the center and secure it with a knot. The knot should be on the same side as the edges that have glue on them.
Step 4: Fan Petals and Sew Together
This step is why we put glue on the edges: it keeps them from fraying when you sew the layer into a round shape.
Working from the underside, sew together the loose edges by pinching the two glued surfaces together and threading the needle through them.
These can be large stitches, and they don’t have to be neat…no one will see the underside of your flower!
Check the front to make sure you sew in the correct place.
Tie off the thread and repeat on the other side.
Repeat steps 2-4 with the smallest burlap square (this is your top layer).
Step 5: Make Middle Fringy Layer
This contrasting layer is made the same way as the others with two exceptions:
1) There is no need to cut the petals after folding the burlap into 1/4.
2) To fray, it, pull out the horizontal(ish) threads until you’ve removed enough to your liking.
Check if you like the results by stacking the three layers and taking a look at them.
Step 6: Sew 3 Levels Together
Using a strand of burlap as thread, attach the three layers together.
Starting from the bottom, pull the needle threaded with strands of burlap through the center of all three levels, then back down again.
Do this two or three times, then knot off from underneath. Pull as tightly as you need to get the look you want.
Step 7: Attach Decoration
Glue or sew a jewel to the center of the top layer. Or you can do what I did and roll strands of burlap into a small ball and glue.
Video: How to Make Burlap Flowers
We are not the best videographers of how-tos in the world. But I hope I added enough photos in between the live shots to give you the idea.
There really is no wrong way. This version relies on messiness and unevenness to make it “work.” Enjoy.
If you’d like to jump to each step, here are the timestamps in the How to Make Burlap Flowers video:
1:01 Prepare Burlap
1:52 Begin Petal-ed/Leaf Base Layer
2:55 Cut Petals/Leaves
4:47 Secure Center of Petal-ed Base Layer
6:25 Fan Petals and Sew Into Circle
8:22 Make Middle Fringy Layer
9:09 Sew Three Layers Together
13:23 Attach Decoration to Top
Buy Different Types of Already-Made Burlap Flowers
If studying up on how to make burlap flowers takes too much time or you do not like the way these look, you could also buy from someone who makes them.
I’ve listed a variety of my favorites from Etsy below. (Note, you can find ready-made burlap flowers in our shop section. Or get more info about each of the pictured ones below.) you can find these and others here.)
Also, look in the comments where Delene asked about mixing styles. My answer has a couple more ideas with pictures.
Burlap Flowers with Stems
I have a tutorial for how to make burlap flowers with stems in the bouquet here. But you can buy different styles as well. Here are a variety of stemmed styles you may like.
Top: These lovely long stem roses come in your choice of over 30 different colors. Each is 2″-4″ diameter with 12″ long stems.
Lauren sells them individually or by the dozen. See the listing for a dozen here or ask her about bulk order discounts.
Middle Left: Sometimes, only single, white long-stem roses will do. These from D’laina are perfect for adding into centerpieces or as a decorative highlight elsewhere.
Middle Right: The bridal and bridesmaids’ bouquets are stunning with burlap flowers as well. Ashelle expertly creates this and other styles. Learn more or buy a burlap rose bouquet from her here.
Bottom: Laverne’s yellow burlap sunflowers are so cool. They are 7″ across and make a significant impact in any decoration or bouquet. Shop or learn more about her sunflowers here.
Bloom-Only Burlap Flowers
If you do not want to deal with learning how to make burlap flowers but want to DIY your decor and cake, these are the perfect choices. Use bloom-only flowers to fill in details around your decorations.
Top left: If you believe variety is the spice of life this collection is for you. Resa will send you 10 burlap flowers in five distinct color/style combinations. Pick from 15 different accent colors.
Top right: I love Kim and Morgan’s structured burlap roses. They make roses with denim, too! Learn more or shop all their styles here.
Middle left: If you prefer not to DIY loopy burlap fabric flowers, Sabina has you covered.
Hers are about 2″ across and have a unique, quilled-look center. Learn more or buy from Sabina here.
Middle right: Greta’s burlap flowers add a unique touch to any country theme decor. Learn more or buy from her here.
Bottom: Burlap sunflowers! This is another of Resa’s designs. She hand-dyes the golden yellow petals. These are 4″ wide, but she takes custom orders. Learn more or shop her burlap sunflower listings here.
More DIY Wedding Decoration Tutorials

Top 5 Ideas for Decorating Wine Glasses

Top 3 DIY Wedding Flowers Ideas – Photos and Inspiration

How to Make a Burlap Bow the Secret, 6-Step Way

How to Make a Rope Heart in 5 Steps

How to Make Burlap Flowers the Unique, 3-Layer Way

DIY Personalized Glitter Wine Glasses. 5 Steps!

DIY Giant Paper Flowers with Template. 5 Steps!

Easy DIY Burlap Flowers

How to Sort of DIY Five Favorite Rustic Wedding Centerpieces

DIY Fabric Flowers with Lace and Burlap. Tutorial with Video.

5 Favorite Gold and Glitter DIY Wedding Tutorials


Delene Atterberg
Thursday 30th of August 2018
Looking for pricing, for the cream color and natural color. Burlap of many different types.. Roses and the 30 bunch pricing..Thanks..
Bobette Kyle
Friday 31st of August 2018
Hi Delene,
To mix up types or styles of roses, I'd recommend ordering from different artisans and mix them. The three below are all on Etsy and you can use the cart feature ... add item(s) you'd like from each seller to the cart and you will be able to see a grand total. And if they do not have a listing that fits your needs, you can contact each directly for a special order. Here is a mix you may like:
(1) Lauren can make custom orders in bunches. You can get them in whatever mix of light (cream) or dark natural, plus white. Individual roses are $1.99 each, but message her about a bulk discount. Contact her at her shop through this link (Look under her pic in the top right). Here's a photo of the kind she makes:
(2) Sabina is another that makes roses on stems. She has three sizes. I'm partial to the small ones that look like buds. You can order by each at $1.35. Off-white, oyster, natural, and brown are among the color selections. Take a look at all three sizes and her listings here. Here's a photo of Sabina's small roses:
(3) Gabriella's roses are loopier, so could add a nice contrast to your bunches. She mixes natural, ivory, and dark brown. Her regular price runs $2.00 each, but message her about a bulk discount and the mix of colors you'd need. Click here to go to her shop. Here's what her roses look like:
If you are looking for a different mix or just want to see more styles, this link will take you to all the different burlap roses with stems on Etsy.
I hope this helps!
Bobette
Lanna
Monday 5th of February 2018
Great tutorial, thanks for sharing.